LEVEL 1 - EXPERIMENTS
EXP1-- Hello World LED Blinking
EXP2-- Traffic Light
EXP3-- LED Chasing Effect
EXP4-- Button Controlled LED
EXP5-- Buzzer
EXP6-- RGB LED
EXP7-- LDR Light sensor
EXP8-- Flame sensor
EXP9-- LM35 Temperature Sensor
EXP10-- IR Remote Control Using TSOP
EXP11-- Potentiometer analog Value Reading
EXP12-- 7 Segment Display
-- Experiment01 -- Hello World LED Blinking --
Components Required
- Arduino UNO
- A Breadboard
- Male to male jumper wires (x2)
- LED
- USB cable to connect the arduino
- Resistor
Circuit Diagram
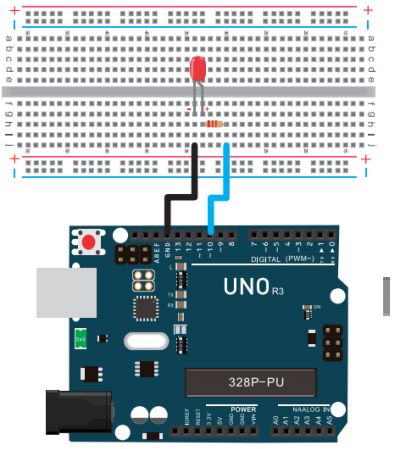
Code
Video
Go to Top
-- Experiment02 -- Traffic Light --
Components Required
- Arduino board *1
- USB cable *1
- Red M5 LED*1
- Yellow M5 LED*1
- Green M5 LED*1
- 220Ω resistor *3
- Breadboard*1
- Breadboard jumper wires* several
Circuit Diagram
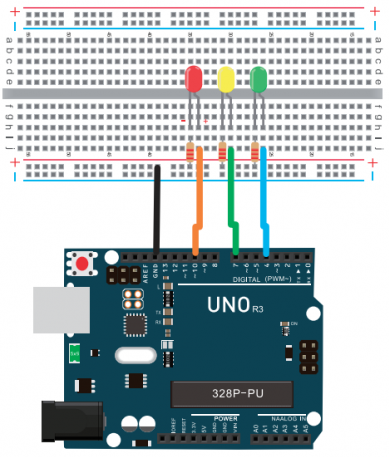
Code
Video
Go to Top
-- Experiment03 -- LED Chasing Effect --
Components Required
- Arduino UNO
- A Breadboard
- Male to male jumper wires (x2)
- LED
- USB cable to connect the arduino
- Resistor
Circuit Diagram
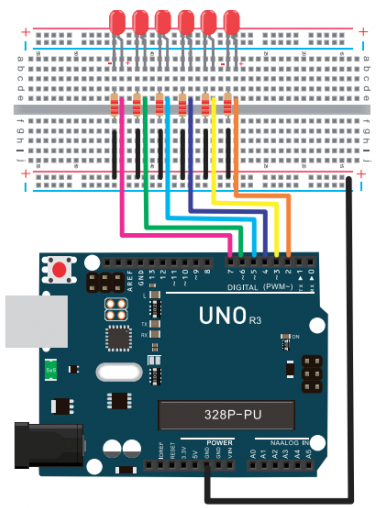
Code
Video
Go to Top
-- Experiment04 -- Button Controlled LED --
Components Required
- Arduino UNO
- Button switch*1
- MRed M5 LED*1
- 220ΩResistor*1
- U10KΩ Resistor*1
- Breadboard*1
- Breadboard Jumper Wire*6
- USB cable*1
Circuit Diagram
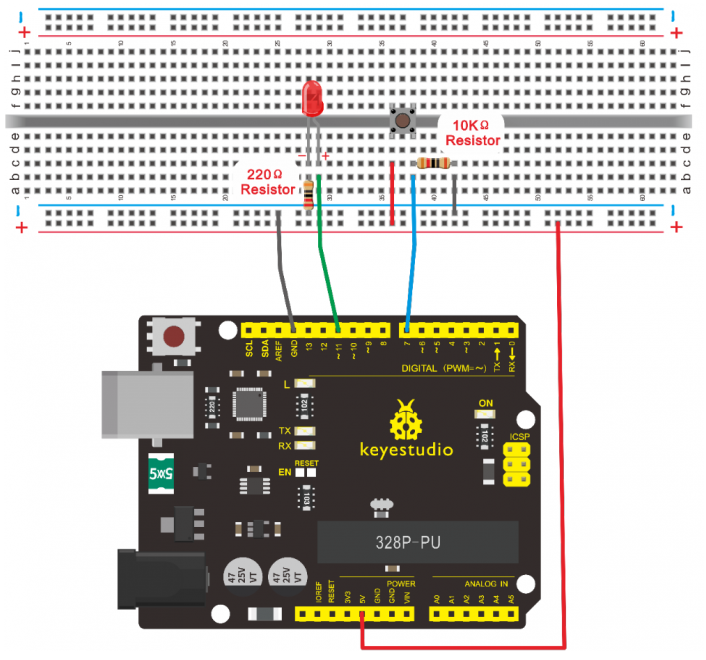
Code
Video
Go to Top
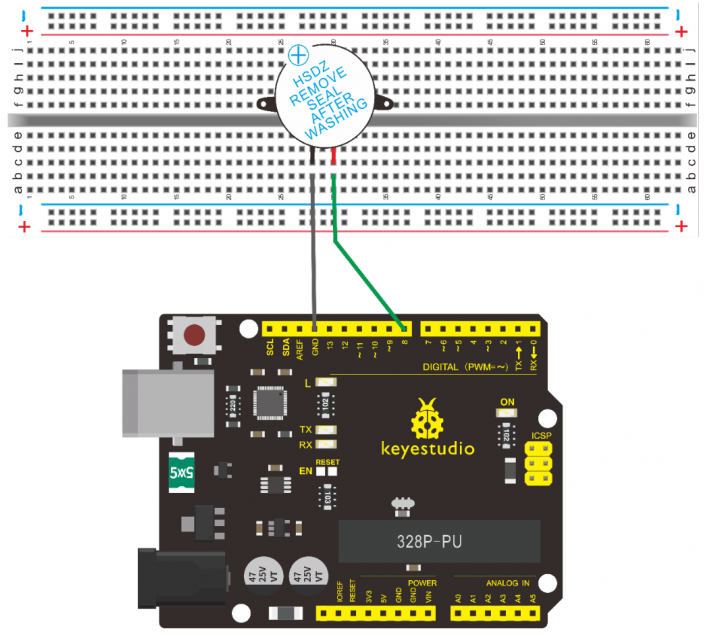
-- Experiment05 -- Buzzer --
Components Required
- Arduino UNO
- Buzzer*1
- Breadboard*1
- Breadboard Jumper Wire*2
- USB cable*1
Circuit Diagram
Code
Video
Go to Top
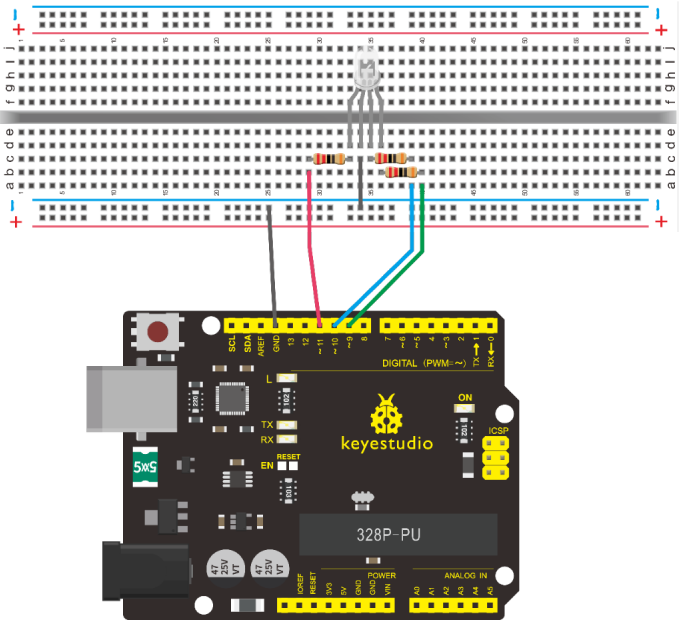
-- Experiment06 -- RGB LED --
Components Required
- Arduino UNO
- USB Cable * 1
- RGB LED * 1
- Resistor *3
- Breadboard jumper wire*5
Circuit Diagram
Code
Video
Go to Top
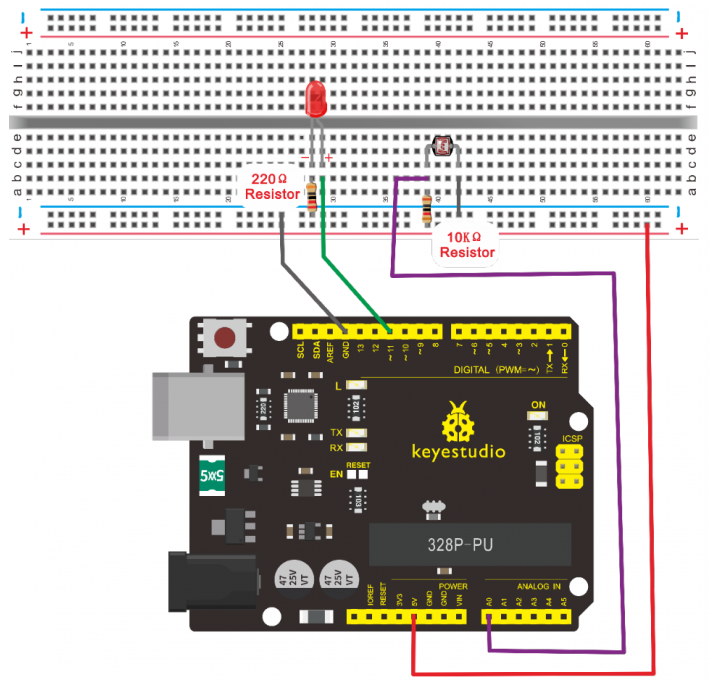
-- Experiment07 -- LDR Light sensor --
Components Required
- Arduino UNO
- Photo Resistor*1
- Red M5 LED*1
- 0KΩ Resistor*1
- 220Ω Resistor*1
- Breadboard*1
- Breadboard Jumper Wire*5
- USB cable*1
Circuit Diagram
Code
Video
Go to Top
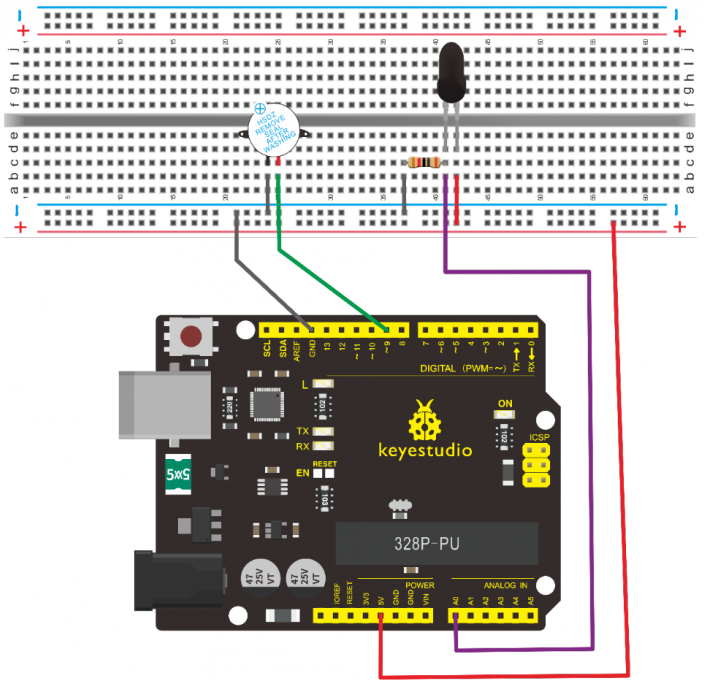
-- Experiment08 -- Flame sensor --
Components Required
- Arduino UNO
- Flame Sensor *1
- Buzzer *1
- 10K Resistor *1
- Breadboard Jumper Wire*6
- USB cable*1
Circuit Diagram
Code
Video
Go to Top
-- Experiment09 -- LM35 Temperature Sensor --
Components Required
- Arduino UNO
- LM35*1
- Breadboard*1
- Breadboard Jumper Wire*5
- USB cable*
Circuit Diagram
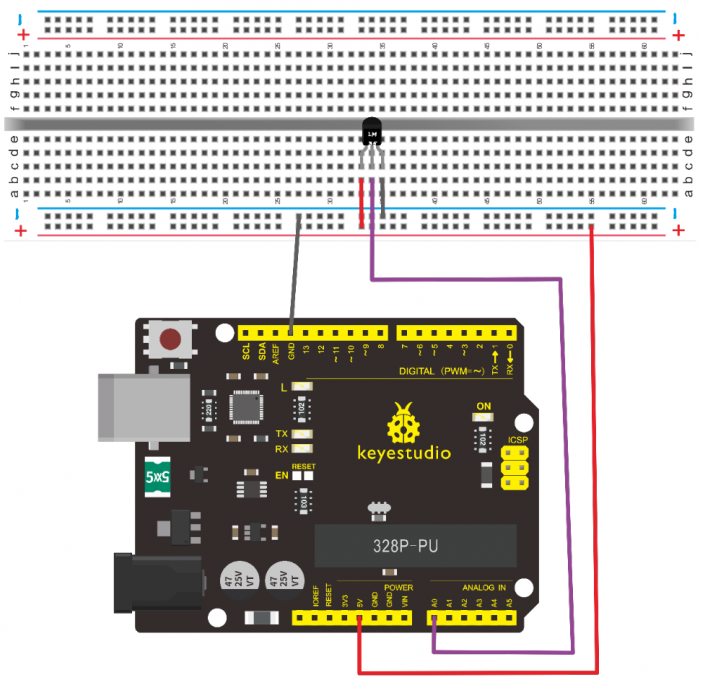
Code
WORKING
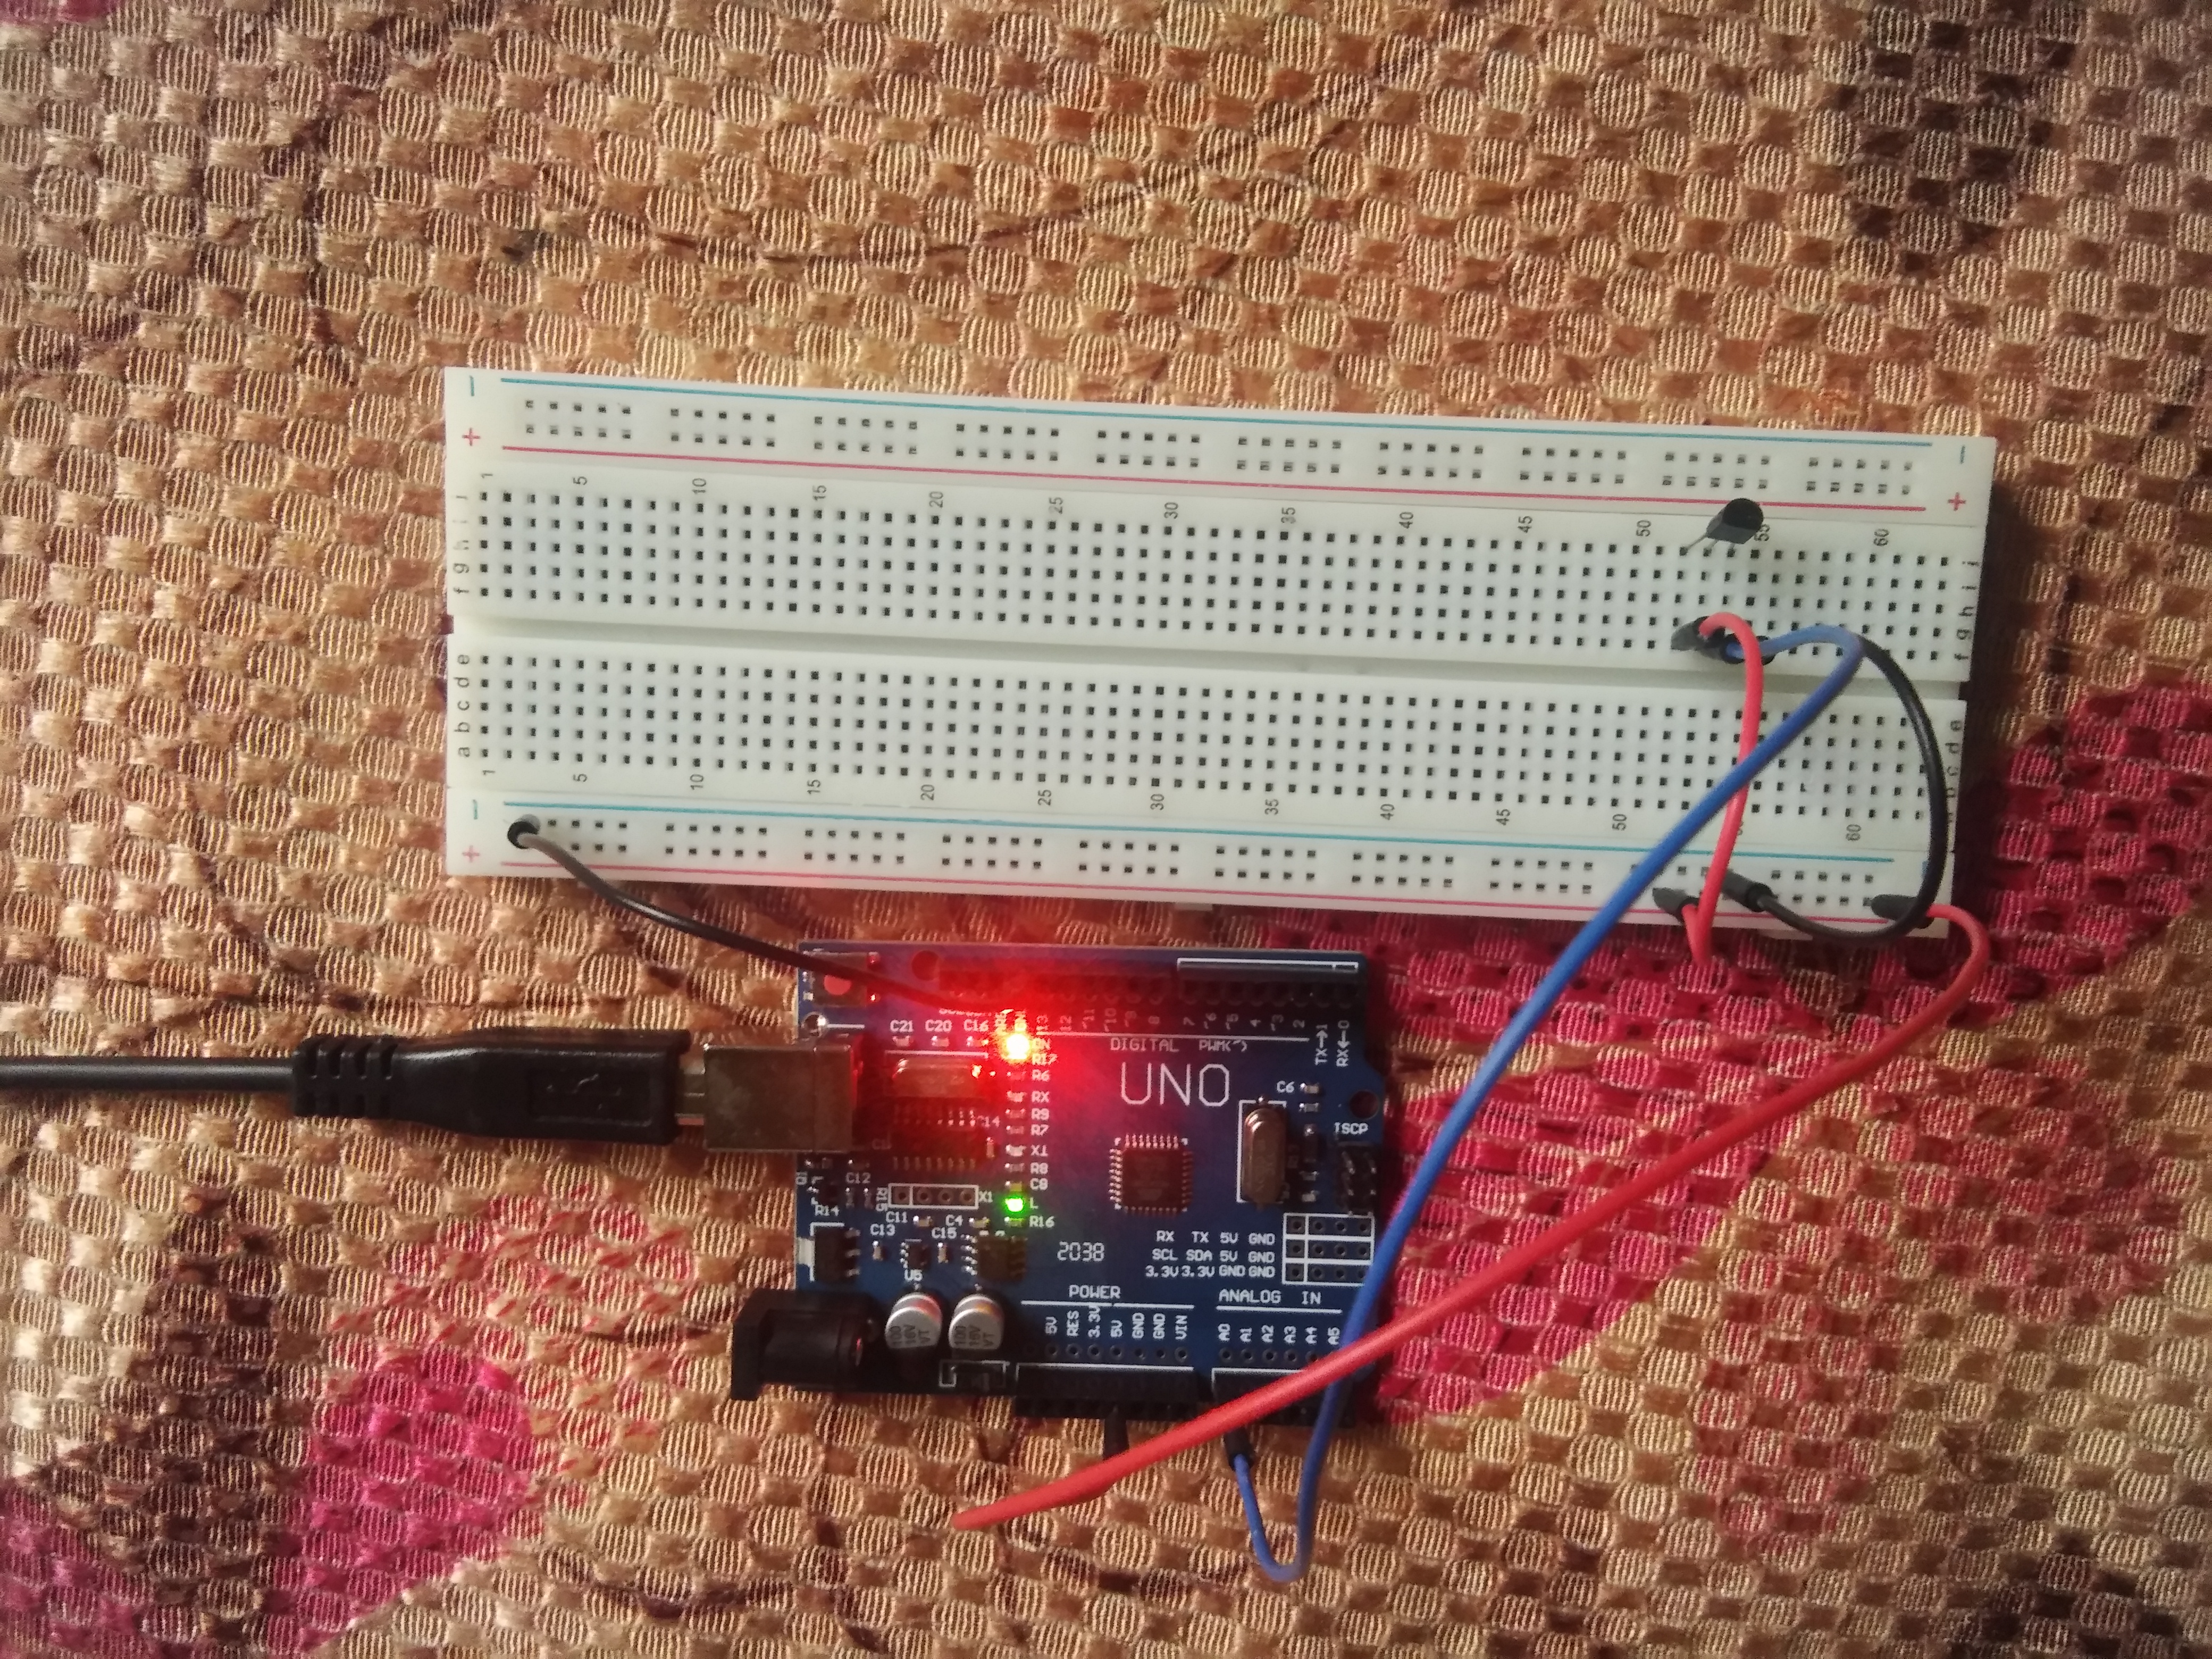
SERIAL MONITOR OUTPUT
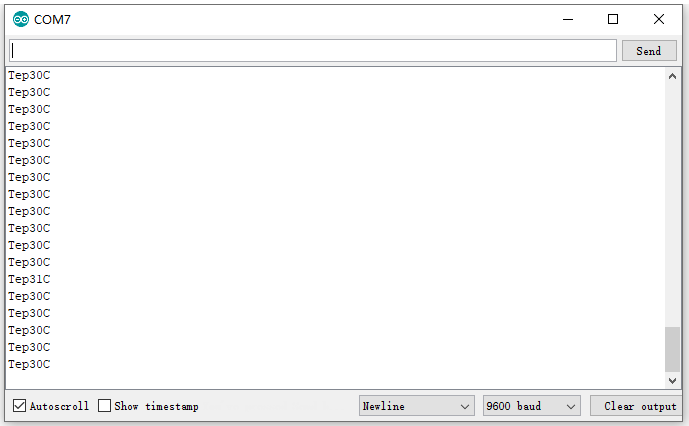 Go to Top
-- Experiment10 -- IR Remote Control Using TSOP --
Components Required
- Arduino UNO
- Infrared Remote Controller(You can use TV Remote or any other remote) *1
- Infrared Receiver *1
- LED *6
- 220ΩResistor *6
- Breadboard Wire *11
- USB cable*1
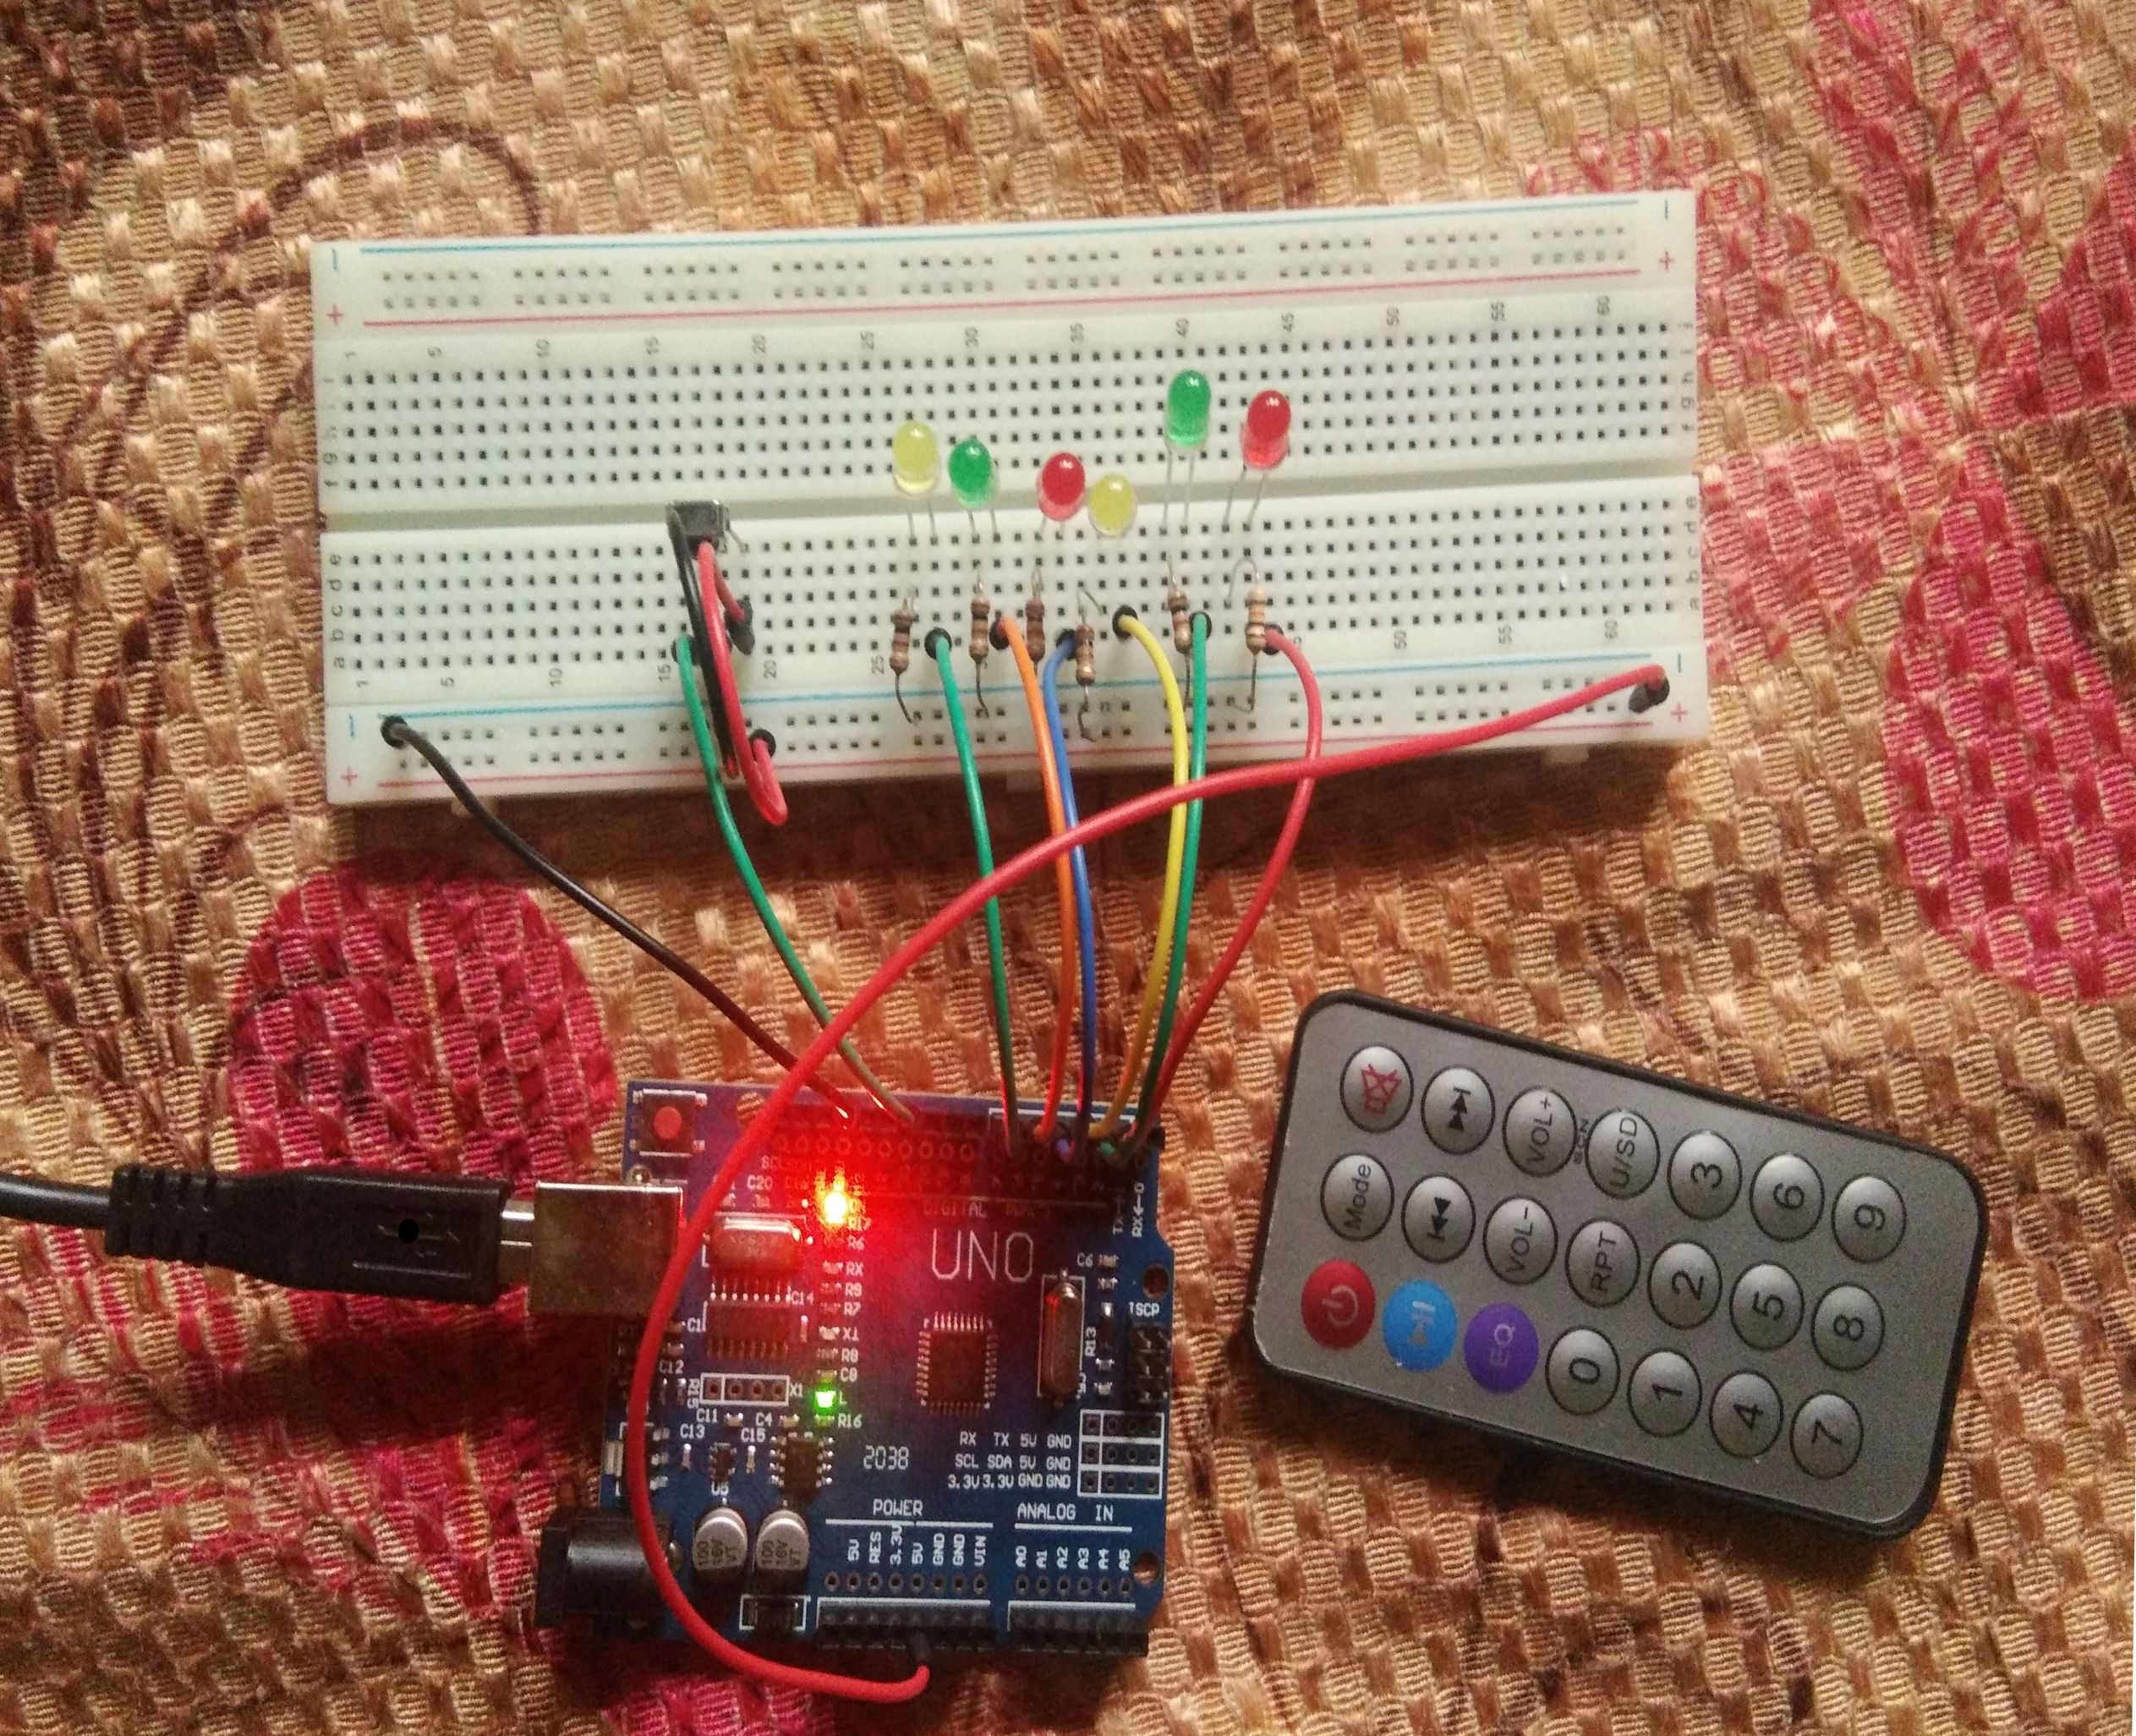
Circuit Diagram
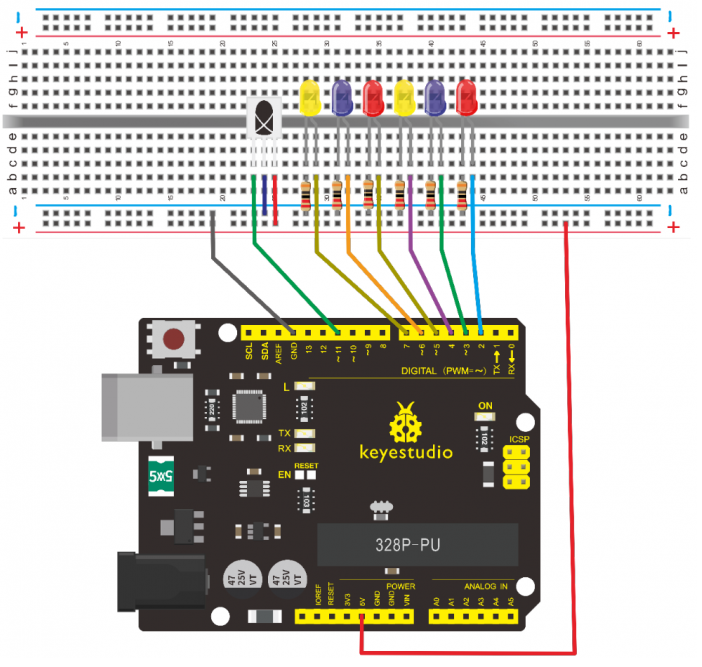
Code
OUTPUT
 Go to Top
-- Experiment11 -- Potentiometer analog Value Reading --
Components Required
- Arduino UNO
- 10K Potentiometer *1
- Breadboard*1
- Breadboard Jumper Wire*3
- USB cable*1
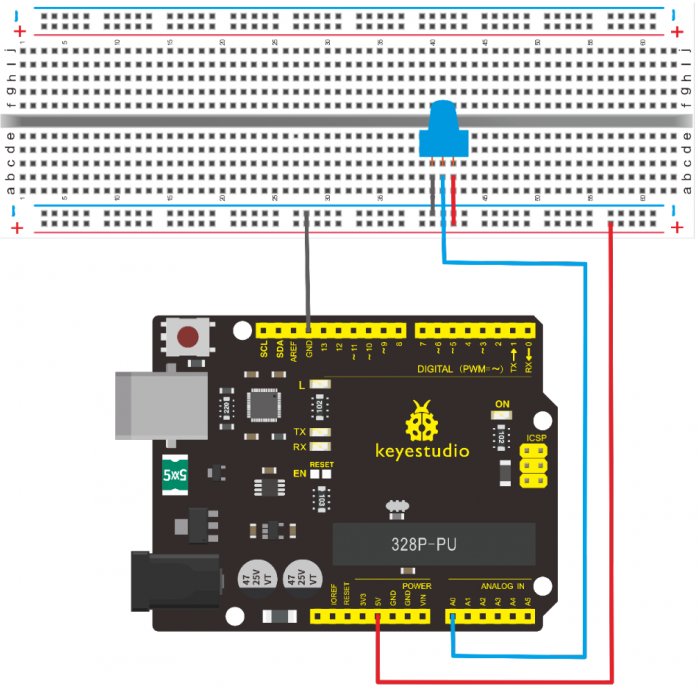
Circuit Diagram
Code
Video
Go to Top
-- Experiment12 -- 7 Segment Display --
Components Required
- Arduino UNO
- 1-digit LED Segment Display*1
- 220Ω Resistor*8
- Breadboard*1
- Breadboard Jumper Wires *several
- USB cable*1
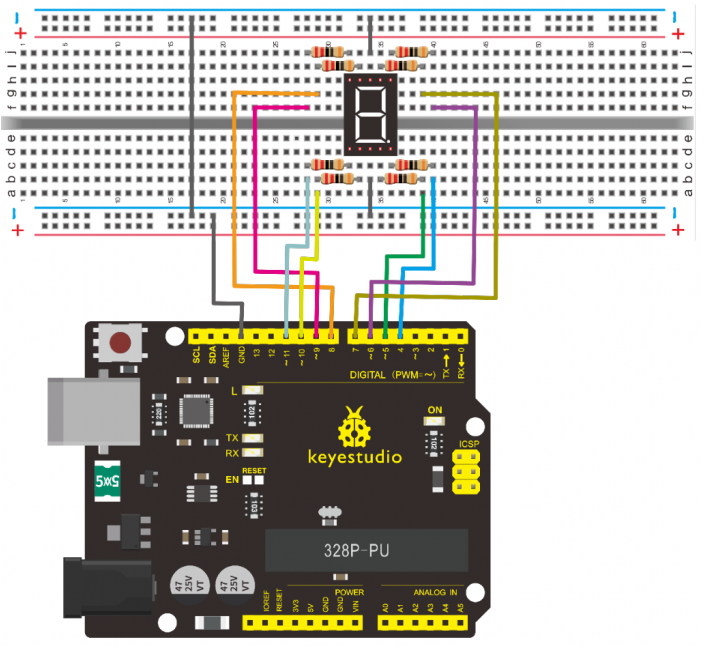
Circuit Diagram
Code
Video
Go to Top